
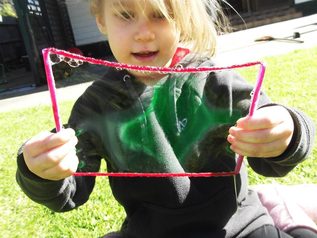
Bubbles, everyone loves them regardless of age, gender or religion. They are a magical thing that can keep kids occupied for hours, but have you ever tried mixing it up a little bit? Adding a bit of colour, doing a little DIY bubble making, maybe even some art & craft with bubbles? I like to get the kids hands on & covered in soap when playing with bubbles, it's one of the joys of being a kid! So here is one of my way of putting a twist on traditional bubbles.
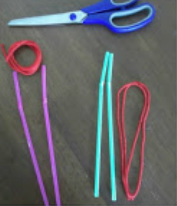
For this you will need:
1 long piece of wool
2 straws
Scissors
Bubble mix
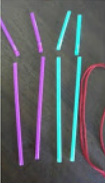
If you have bendy straws you will need to cut the bendy part of the straw off first.
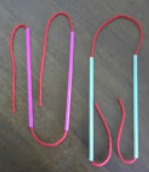
Thread your string straight through both straws then tie a knot at the end of the strings to hold them together.
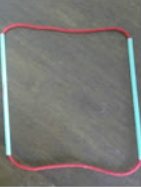
Put the string so that the knot slips into one of the straws & you're all set!
In our home today, we have our 3 kids. Being a blended family as well as foster parents, there are often 5 or more kids here at a time. The question of pocket money comes up frequently and so does the nagging to have kids help with chores. If you ask around, all kids have chores. They range from taking care of animals to the dishwasher to the vacuum. Some get paid, some don't. But what is right? I sure haven't got it figured out yet and my oldest is about to turn 15!

A family is a team and in a team we all have positions. Offence and Defence. And, my new tactic is to use that team play as a way to conquer my house. We are breaking the chores down into three groups. Red for difficult, Orange for medium and Green for easy. I'm going to write the chores I want done in cards, and categorise them accordingly. Each family member is going to get a traffic light system of chores. Parents included!
As far as pocket money goes, we have tried that. Did it work? No, I say. I think it encouraged the kids to spend the money on junk food at school. Having coins in their pocket, and an open canteen in school meant that they were spending their money on food! What? It was never enough for a delicious thing at school (a chicken parma sub is $10 in high school!) so it went to biscuits, cakes and ice-creams! So pocket money just became a way to eat junk food.
So, how do we manage the "need for spending money" situation? Well, we set up a debate type system. The kids need to come to us and argue a point to us about what they want money for, what they need it for and how they are going to use it. It has to be a worthwhile and sometimes gets to be hilarious as they argue that they want to buy a slurpee from school because its a hot day. We argue reasons back of course, like it might dirty their socks, and they are learning how to stand up for themselves, think things through and be creative.
Who knows if what we are doing is right or wrong? Its always such a gamble and everyone seems to be an expert, but you. This is what I do and hopefully if you are confused about your kids and chores, maybe I've given some ideas!
Written by guest writer Alice Slamani. Known as The Laundry Fairy and also Creative Consultant at gFocus Photography (
www.gFocusPhotography.com)
Some of our jobs!

Red: Unstack dishwasher
Red: Wipe counters in bathroom each morning
Red: Take rubbish out each day and bins out on rubbish pick up day
Orange: Fold socks
Orange: Pick up shoes and put away (front door)
Orange: Feed cat
Green: Wipe front of fridge
Green: Sweep the front porch
Green: Windex the mirrors.
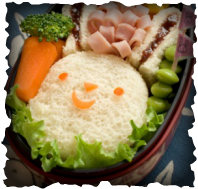
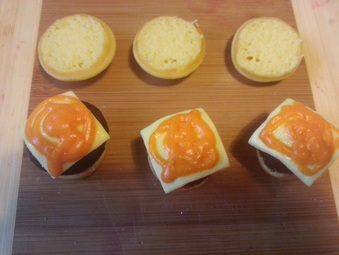
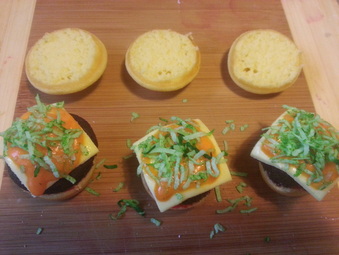
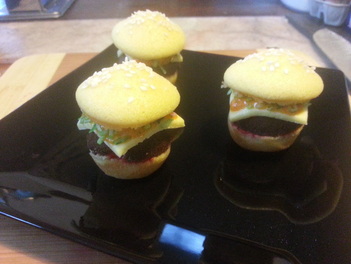
Ham flowers are a fun, quick way to snazz up an everyday lunch. Whether it's in a lunchbox or on a plate, there's never a bad time for a ham flower to appear! These adorable little snacks are assembled in 4 simple steps, making them an easy fix to a boring meal in a matter of minutes!
This ham flower tutorial is one of many step-by-step tutorials in my new book 'Funky, Fresh Food - Your Step-By-Step Guide To Making Healthy Food Fun!' which is available for pre-order
here. The book is due to be released July 1st 2013 & contains 48 illustrated pages to help you work your way through 26 fun, healthy snacks suited to both the lunchbox & the plate, as well as some handy tips & tricks including 6 ways to stop fruits from browning in your kidlets lunchbox & how to make rockmelon roses - a Creative Kidlets 101 exclusive tutorial!
It's as easy as punch!
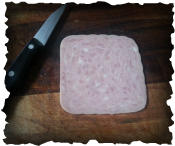
Start with a piece of ham; you can use round or square and a small knife. This technique can also work with turkey or a thin-cooked egg omelette.
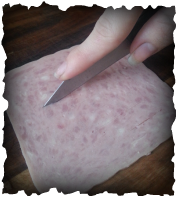
Cut lines in the middle of ham, but not all the way. The lines don’t need to be the exact same distance apart & depending on how thick or thin you want the ‘petals’ to be is how thick or thin of a gap you want between each slice. Be sure not to cut the lines too close to the edge of the ham otherwise your flower will split when you roll it up.
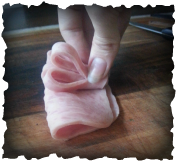
Fold the ham in half in the same direction that you made the slices. Roll up the folded ham but make sure to keep a fairly tight roll to keep the "stem" of the flower together & sturdy.
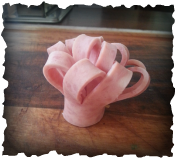
Fan out the petals of the ham flower & cut the base of the stem to make it flat if you prefer then tuck into the lunchbox or place it where you like on the plate.


 RSS Feed