Christmas Day is creeping up on us. I always seem to find that the gap between opening the presents and visiting the family quickly becomes quiet & boring for the little ones so I put my thinking cap on to try & think of ways to resolve it. Thankfully a few nights ago I came up with a solution!
I came up with a poem to leave on a letter from Santa at the ends of their beds on Christmas Eve night. They will awake in the morning to see the letters & wah-lah! we have a solution for the empty time space - a candy cane hunt around the house in our PJ's!
I have left a 2 blank designs below, both the same but with different pictures, but you can make your own of course! We have our printed out on a 4x6 matte photo card because we couldn't find any special Santa Paper - maybe this is a job for next years 'Christmas To-Do List' ;)
Each poem reads:
I have just finished delivering toys,
To all the good little girls & boys,
I left some candy canes behind,
How many of them can you find?
 So yesterday I shared an idea to get everyone kick-started with their spring/summer activities. It was a wonderful little trick I started last year with my pair when we found ourselves lost for what to do in what we considered a new & foreign town as we had not long moved to Melbourne & had spent all winter in hibernation because us Queenslanders just weren't used to the cold weather AT ALL! Anyway - this became the birth of the "You're not bored!" Jar, a plastic jar filled with originally 101 rainbow paddle pop sticks with one activity on each stick that were free for kidlets to do (or at least try), over the past year we have slowly added to our collection & I think we are sitting at about 130 ideas now BUT here is the first 101 that we started with :)
Our list of 101 activities - feel free to add your own!
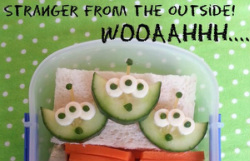 Today's lunch theme was 'space' and it wouldn't be a space themed lunch without aliens now would it? ;)
These cute little creatures, very well known from Toy Story, are a piece of cake to make, are extremely tasty AND are 100% healthy! Just follow the easy tutorial below & you will be on your way to creating a healthy snack that kidlets of all ages will love.
 Eating habits are something that is learnt not something someone is born with. So when your kidlets grow up, what they eat, will be based on the habits they picked up as a child..
Every day less & less people cook their meals from scratch because it’s faster & simpler to grab some take away on the way home from work or nuke up a frozen meal.
When you think about it, all it takes is a few simple tools & tricks as well as an idea on how to better balance yours & your little ones diets is all that is needed to fight against the 'fun' image that the fast food industry portrays.
1. Be a good role model.
Practice what you preach. Kidlets are very monkey-see-monkey-do, if you want to encourage healthy eating you need to lead by example.
2. Make mealtime special.
There is a never ending list of things you can do to make mealtimes fun, from making the appearance of the meal appealing to kidlets, to having mealtimes in a special place, but your number one priority in attempting to make it a special time is to set a routine. Teach your kidlet to sit at the table & enjoy the meal with the family, cherish the time & make it enjoyable for everyone.
3. Make sure your child eats breakfast.
Yes, we have all heard it before, "Breakfast is the most important meal of the day.". But it isn't said for the sake of saying it, after a long nights sleep & all those hours without food or drink it is important to refuel the engines with a healthy, wholesome breakfast. Some kids don't take to eating breakfast too well & if you find that is the case then start small & work your way to bigger meals. Try to avoid a sugary breakfast, while it gives a fast boost of energy from the sugar content, it wears of a lot quicker than a healthy, balanced breakfast would.
4. Take your kids shopping with you.
It may be easier to go alone when it comes to food shopping but taking your little ones with you & allowing them to question & explore the raw foods around them is a good start to introducing them to healthier eating habits. Take them with you when you aren't in a rush & take your time walking down the aisles that contain the natural, organic & unprocessed foods - produce & deli/meat departments. If your kidlet seems interested in a certain food, encourage them to explore the item & answer any questions they may have. Take it home & allow your kidlet to try it so that they can make their own choice as to whether they like it - never assume your child will not like the taste of something, kidlets like feeling like they are making the choice when it comes to what they eat.
5. Be flexible!
Anything in moderation is okay. Remember to give a treat every now & then. Obviously take away or candy every day for a week is not 'in moderation' and is unhealthy but a cookie or an ice cream in amongst a balanced diet of healthy meals & snacks is fine, even healthy, for anyone.
6. Don’t be a short-order cook.
Don't cook different meals for each kidlet as well as a meal for yourselves. Make one whole meal as a family & adapt it slightly to suit the kidlets. Be patient, if they don't take to it straight away then try again the next week. There are hundreds of studies out there that state that it can take up to 12 attempts to get a child to try something new, so if they don't take to it straight away then try again.
7. Let kids help in the kitchen.
Even a 2 year old can peel a potato & wash a carrot. Get your little ones more active in the kitchen & encourage them to help prepare & cook their snacks. Kidlets love eating food they create & it will make them more likely to try new foods.
8. Don’t buy into marketing for kids.
Kidlets don't need chocolate bars, frozen pizzas, chicken nuggets or any of the other snacks that the media like to make the kids feel is a priority. Encourage your little ones to eat healthier rather than suckering into their wants which are based on the advertisements they see everywhere that are aimed at kidlets.
Hungry for more? Follow us online!
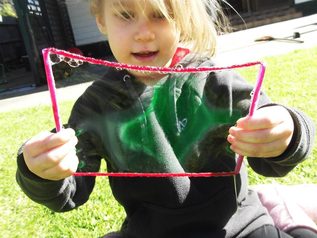
 Bubbles, everyone loves them regardless of age, gender or religion. They are a magical thing that can keep kids occupied for hours, but have you ever tried mixing it up a little bit? Adding a bit of colour, doing a little DIY bubble making, maybe even some art & craft with bubbles? I like to get the kids hands on & covered in soap when playing with bubbles, it's one of the joys of being a kid! So here is one of my way of putting a twist on traditional bubbles.
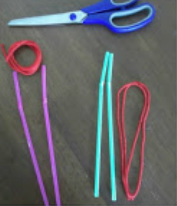
For this you will need:
1 long piece of wool
2 straws
Scissors
Bubble mix
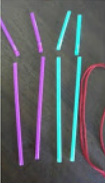
If you have bendy straws you will need to cut the bendy part of the straw off first.
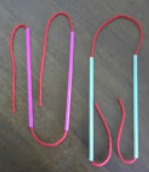
Thread your string straight through both straws then tie a knot at the end of the strings to hold them together.
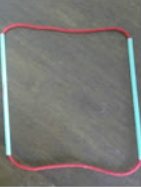
Put the string so that the knot slips into one of the straws & you're all set!
In our home today, we have our 3 kids. Being a blended family as well as foster parents, there are often 5 or more kids here at a time. The question of pocket money comes up frequently and so does the nagging to have kids help with chores. If you ask around, all kids have chores. They range from taking care of animals to the dishwasher to the vacuum. Some get paid, some don't. But what is right? I sure haven't got it figured out yet and my oldest is about to turn 15!
 A family is a team and in a team we all have positions. Offence and Defence. And, my new tactic is to use that team play as a way to conquer my house. We are breaking the chores down into three groups. Red for difficult, Orange for medium and Green for easy. I'm going to write the chores I want done in cards, and categorise them accordingly. Each family member is going to get a traffic light system of chores. Parents included!
As far as pocket money goes, we have tried that. Did it work? No, I say. I think it encouraged the kids to spend the money on junk food at school. Having coins in their pocket, and an open canteen in school meant that they were spending their money on food! What? It was never enough for a delicious thing at school (a chicken parma sub is $10 in high school!) so it went to biscuits, cakes and ice-creams! So pocket money just became a way to eat junk food.
So, how do we manage the "need for spending money" situation? Well, we set up a debate type system. The kids need to come to us and argue a point to us about what they want money for, what they need it for and how they are going to use it. It has to be a worthwhile and sometimes gets to be hilarious as they argue that they want to buy a slurpee from school because its a hot day. We argue reasons back of course, like it might dirty their socks, and they are learning how to stand up for themselves, think things through and be creative. Who knows if what we are doing is right or wrong? Its always such a gamble and everyone seems to be an expert, but you. This is what I do and hopefully if you are confused about your kids and chores, maybe I've given some ideas! Written by guest writer Alice Slamani. Known as The Laundry Fairy and also Creative Consultant at gFocus Photography ( www.gFocusPhotography.com) Some of our jobs! 
Red: Unstack dishwasher
Red: Wipe counters in bathroom each morning
Red: Take rubbish out each day and bins out on rubbish pick up day
Orange: Fold socks
Orange: Pick up shoes and put away (front door)
Orange: Feed cat
Green: Wipe front of fridge
Green: Sweep the front porch
Green: Windex the mirrors.
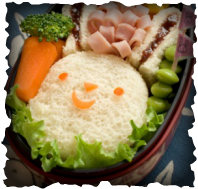 Ham flowers are a fun, quick way to snazz up an everyday lunch. Whether it's in a lunchbox or on a plate, there's never a bad time for a ham flower to appear! These adorable little snacks are assembled in 4 simple steps, making them an easy fix to a boring meal in a matter of minutes! This ham flower tutorial is one of many step-by-step tutorials in my new book 'Funky, Fresh Food - Your Step-By-Step Guide To Making Healthy Food Fun!' which is available for pre-order here. The book is due to be released July 1st 2013 & contains 48 illustrated pages to help you work your way through 26 fun, healthy snacks suited to both the lunchbox & the plate, as well as some handy tips & tricks including 6 ways to stop fruits from browning in your kidlets lunchbox & how to make rockmelon roses - a Creative Kidlets 101 exclusive tutorial!
It's as easy as punch! 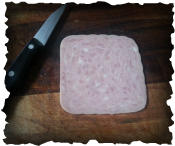
Start with a piece of ham; you can use round or square and a small knife. This technique can also work with turkey or a thin-cooked egg omelette.
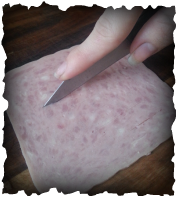
Cut lines in the middle of ham, but not all the way. The lines don’t need to be the exact same distance apart & depending on how thick or thin you want the ‘petals’ to be is how thick or thin of a gap you want between each slice. Be sure not to cut the lines too close to the edge of the ham otherwise your flower will split when you roll it up.
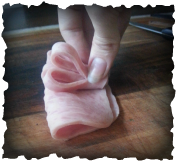
Fold the ham in half in the same direction that you made the slices. Roll up the folded ham but make sure to keep a fairly tight roll to keep the "stem" of the flower together & sturdy.

Fan out the petals of the ham flower & cut the base of the stem to make it flat if you prefer then tuck into the lunchbox or place it where you like on the plate.
 In my experiences, there is nothing kidlets love more than getting colourfully grubby with finger paints. And most days they will of course stick 10 million tonnes of paint in the one spot until the paper is tearing & decomposing - but that's okay, they are still learning. My only problem with the over-use of paint by kidlets is the price you pay for store bought paint which is never as 'non-toxic' as they say and always comes with that funny smell and hard to get off stain it leaves on clothing & walls. So over the years I have resorted to making my own paints at home - from everyday things you will always find in your cupboard. Both edible and non-edible, tempera powder and food dye - I have tried almost every recipe imaginable, many fails & many successes (as expected!) so to help you avoid all the trials & errors I have compiled my 3 most favourite paint recipes below to share with you all!
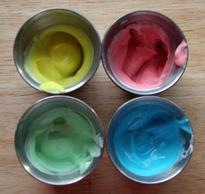
 Homemade Bath Paint!What you need:muffin tinshaving creamfood coloringpaint brushWhat you do:- Squirt the shaving cream into each muffin hole.
- Put a couple of drops of food coloring on to each mound of shaving cream. Stir well.
- Go to town painting the bathtub walls (and yourself)!
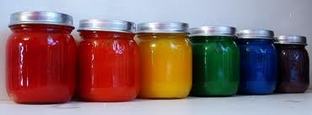
 Homemade Poster Paint!What You Need:- 1/4 cup flour
- 1 cup water
- Small jars or plastic containers
- 3 tablespoons powdered tempera paint per container
- 2 tablespoons water per container
- 1/2 teaspoon liquid starch or liquid detergent per container (optional)
What To Do:- Measure flour into saucepan.
- Slowly add 1 cup water while stirring to make a smooth paste.
- Heat, stirring constantly, until paste begins to thicken.
- Cool.
- Measure 1/4 cup paste into each small container.
- Add 3 tablespoons powdered tempera paint and 2 tablespoons water to each container.
- For a matte finish, add liquid starch. For a glossy finish, add liquid detergent.
- Store covered.
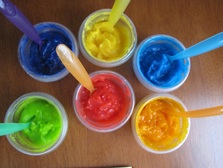 Homemade Finger Paint!
What You Need:
1 cup flour
1/2 cup cornstarch
2 tb salt
2 cup cold water
3 1/2 cup hot water
food coloring
What To Do:
1. In saucepan, mix dry ingredients together.
2. Slowly add cold water to the dry ingredients, whisking as you add.
3. Bring to boil, over medium heat, as you add hot water, whisking continuously.
4. Boil mixture for about 1-2 minutes, whisking continuously, until thick and lumps are gone.
5. Allow to cool slightly in pan then transfer to separate bowls to add color.
6. Mix in a few drops of food coloring to achieve desired color.
7. Allow to cool completely before painting.
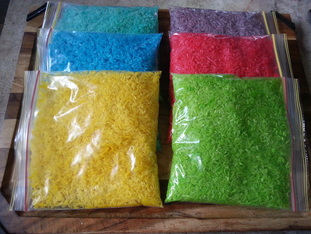 Up until recently I had assumed that everyone knew how to make rainbow rice until I was asked by quite a few how to make it and where I had purchased it from. I shocked a few people when I said I had made it myself at home and because of this I came to the conclusion that it would be far easier and of more value to share this simple trick with the world for those who were unaware that you can make rainbow rice with 3 simple ingredients that everyone has in their home!
To make rainbow rice you will need: 2 cups of long grain rice for each colour you would like to make, 1/4 cup of vinegar for each colour you would like to make, ordinary food dye & a ziplock bag for each colour.
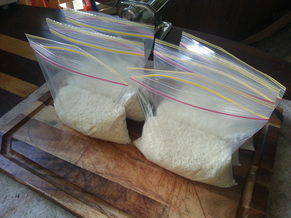 First, place 2 cups of rice in each bag (measurements don't need to be precise, just a rough measure is fine - just get as close as possible or you may end up with a soggy lump of rice). One bag at a time add 1/4 cup of vinegar then the drops of food dye to the mix. Ziplock shut the bag and give it a good shake. Repeat this step for each colour you would like. To dry out the rice you may leave it in the bag with the ziplock open overnight, lay it flat for 4 hours on a piece of baking paper or you can place it on a lined baking tray in the oven at 100c for 10-15 minutes to quick dry it (be sure to let it cool before allowing the kids to play with it!)
You can mix whatever colours you want and add as many dye drops as you like to get the vibrancy that you are after. It is completely safe for children to eat (if you have those little ones that believe EVERYTHING belongs in their mouth!) & it's much easier to clean than playdough!
That's all there is to it! Remember - rainbow rice is not just for schools & daycares, it is awesome for sensory play and motor skills, even art & craft if you wanted.
 With so much tragedy going on in the USA over the last week, it has got me wondering about the safety of our kids. First there was the bombing at a public event in Boston. Then a horrific explosion in Waco Texas and the shooting at MIT today. Although, we are in Australia, do you ever wonder if this sort of tragedy will reach us here? And, if it was to, how do we keep our kids safe? Mr Rogers, a legendary TV host, teaches us to explain to our kids, in a time of crisis “To Look For The Helpers”. To show our kids to look for those heroes that run into fires and save people. Helpers who are the first on scene to rescue and bring relief. We look up to these heroes as super heroes, and we honestly believe they are. I really believe that it is a great way to comfort our young ones when it comes to world tragedy. But, it still doesn’t teach our kids how to keep safe, or protect our own hearts when we send our kids out into the world without us. A dear friend’s son was involved in a horrific car accident yesterday. He is lucky to escape with his life, let alone survive with only a singed eyebrow from the airbag. He’s an adult and she still cannot comprehend how to keep her adult son safe. So, its not just us with young ones who panic, who worry and who look to whatever higher power to keep our little ones safe. The debate continues. Do we show our kids tragedy and prepare them for what life can bring? Or do we shelter them from danger in the world. How do we balance what is right and what is wrong. Only trial and error can really tell, and evaluating the maturity of the child and what they can handle. I’ve covered stranger danger with my kids (who are mostly teens now), and the “icky factor” that some people carry that make them nervous. I wonder if it helped or harmed my almost 15 year old son recently. He was with his friends, out at a day at the beach when he was confronted by a gaggle of older boys. About 8 20 year old boys approached him when his instinct was to be cautious. That little voice inside of him said “beware”. I’ve always told my kids that the little voice inside of them is God’s way of teaching us right from wrong (although we are not an overly religious family). The “Lads”, as he described them, assaulted him and stole his precious iPhone he got for Christmas. He was distraught at the vulgarity of these Lads, and gave into their demands. Even more so, he was distraught at himself for not fighting for himself. So, did I teach him right from wrong? Did I teach him how to handle danger? I thought I had, but I never covered this. But, his inner voice told him to give in to them, and perhaps that saved him? I will never know. I guess in summary I am saying, bad stuff happens in the world. We have to trust that our young people know what is right and what is wrong when it comes to danger. We have to trust our own parenting to teach them. No matter how much or how little exposure to violence or global tragedy will make them prepared for the adventures they go on, when you think they are safe. Maybe this is the time for belief in a higher power than us. My friend, who’s son was in the car accident, believes in angels and that angels watched over her son. So what harm can come if we just step back and have a little faith. Written by guest writer Alice Slamani. Known as The Laundry Fairy and also Creative Consultant at gFocus Photography ( www.gFocusPhotography.com)
|


 RSS Feed