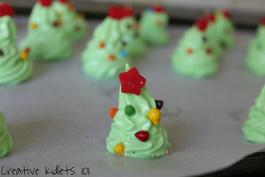
 Tis' the season to be jolly! And there is no better way to celebrate than to have a funky looking sweet treat! These Christmas tree meringues are a cinch to make & taste great too! They make the perfect snack for Christmas parties & store for up to 3 whole weeks (if they last that long!). The recipe below has been altered to suit the meringue trees, if you would like to make any other shape meringue, simply use the same method & ingredients minus the rainbow chips, sugar star & green dye.
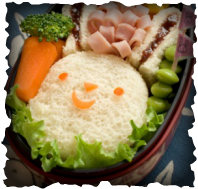
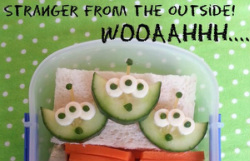 Today's lunch theme was 'space' and it wouldn't be a space themed lunch without aliens now would it? ;)
These cute little creatures, very well known from Toy Story, are a piece of cake to make, are extremely tasty AND are 100% healthy! Just follow the easy tutorial below & you will be on your way to creating a healthy snack that kidlets of all ages will love.
 Eating habits are something that is learnt not something someone is born with. So when your kidlets grow up, what they eat, will be based on the habits they picked up as a child..
Every day less & less people cook their meals from scratch because it’s faster & simpler to grab some take away on the way home from work or nuke up a frozen meal.
When you think about it, all it takes is a few simple tools & tricks as well as an idea on how to better balance yours & your little ones diets is all that is needed to fight against the 'fun' image that the fast food industry portrays.
1. Be a good role model.
Practice what you preach. Kidlets are very monkey-see-monkey-do, if you want to encourage healthy eating you need to lead by example.
2. Make mealtime special.
There is a never ending list of things you can do to make mealtimes fun, from making the appearance of the meal appealing to kidlets, to having mealtimes in a special place, but your number one priority in attempting to make it a special time is to set a routine. Teach your kidlet to sit at the table & enjoy the meal with the family, cherish the time & make it enjoyable for everyone.
3. Make sure your child eats breakfast.
Yes, we have all heard it before, "Breakfast is the most important meal of the day.". But it isn't said for the sake of saying it, after a long nights sleep & all those hours without food or drink it is important to refuel the engines with a healthy, wholesome breakfast. Some kids don't take to eating breakfast too well & if you find that is the case then start small & work your way to bigger meals. Try to avoid a sugary breakfast, while it gives a fast boost of energy from the sugar content, it wears of a lot quicker than a healthy, balanced breakfast would.
4. Take your kids shopping with you.
It may be easier to go alone when it comes to food shopping but taking your little ones with you & allowing them to question & explore the raw foods around them is a good start to introducing them to healthier eating habits. Take them with you when you aren't in a rush & take your time walking down the aisles that contain the natural, organic & unprocessed foods - produce & deli/meat departments. If your kidlet seems interested in a certain food, encourage them to explore the item & answer any questions they may have. Take it home & allow your kidlet to try it so that they can make their own choice as to whether they like it - never assume your child will not like the taste of something, kidlets like feeling like they are making the choice when it comes to what they eat.
5. Be flexible!
Anything in moderation is okay. Remember to give a treat every now & then. Obviously take away or candy every day for a week is not 'in moderation' and is unhealthy but a cookie or an ice cream in amongst a balanced diet of healthy meals & snacks is fine, even healthy, for anyone.
6. Don’t be a short-order cook.
Don't cook different meals for each kidlet as well as a meal for yourselves. Make one whole meal as a family & adapt it slightly to suit the kidlets. Be patient, if they don't take to it straight away then try again the next week. There are hundreds of studies out there that state that it can take up to 12 attempts to get a child to try something new, so if they don't take to it straight away then try again.
7. Let kids help in the kitchen.
Even a 2 year old can peel a potato & wash a carrot. Get your little ones more active in the kitchen & encourage them to help prepare & cook their snacks. Kidlets love eating food they create & it will make them more likely to try new foods.
8. Don’t buy into marketing for kids.
Kidlets don't need chocolate bars, frozen pizzas, chicken nuggets or any of the other snacks that the media like to make the kids feel is a priority. Encourage your little ones to eat healthier rather than suckering into their wants which are based on the advertisements they see everywhere that are aimed at kidlets.
Hungry for more? Follow us online!
 These little bite sized burgers are easier than they look & taste amazing! The full tutorial with clearer images is available in my book 'Funky, Fresh Food!' which can be purchased online in our eStore for as low as $9.95! But for now here is a quick, short 'how-to' for my take on these perfect party treats.
 First you will need to have a batch of baked then cooled vanilla cupcakes and chocolate cupcakes. Cut your vanilla cupcakes in half, these will be the buns. Now cut your chocolate cupcakes into thirds, these will be your patties. You can use any portion of the cupcake for the patty but I prefer to use the middle or base of the cupcake as they are flat sided portions.  Next you will need red frosting. You can either pipe on the icing or spread it with a spoon, it is entirely up to you. Place the red frosting on the base of the cupcake for the tomato sauce/ketchup.  Now place a section of the chocolate cupcake on top, this is the patty. 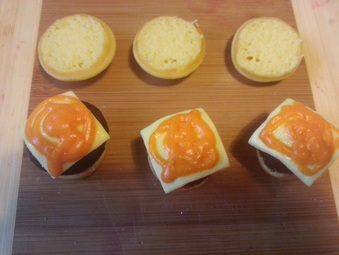 Now the cheese is optional of course so the extra effort isn't required, but for the cheese I made some yellow fondant rolled out to 3mm thick and cut it into squares. The mustard is orange/yellow tinted frosting. Place the mustard and/or cheese on top of the 'patty'. 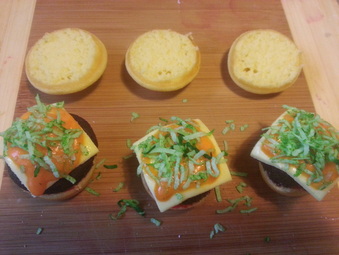 Now add the lettuce. In a ziplock bag place 1/2 cup of shredded coconut & 4-6 drops of green food dye. Zip the bag shut then shake the bag until the dye is spread evenly. Sprinkle the 'lettuce' on top of the mustard. 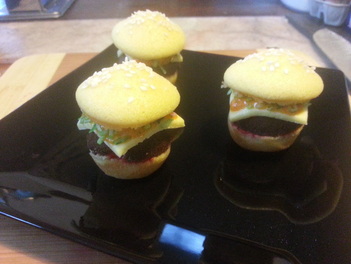 Now add the tops on. To make the burgers look more realistic I like to brush some melted butter (or orange juice if I have any available) on the tops then sprinkle on some sesame seeds. The seeds don't add any extra taste, they are more so for appearance so no need to worry about the cupcakes tasting funny. :)
 Ham flowers are a fun, quick way to snazz up an everyday lunch. Whether it's in a lunchbox or on a plate, there's never a bad time for a ham flower to appear! These adorable little snacks are assembled in 4 simple steps, making them an easy fix to a boring meal in a matter of minutes! This ham flower tutorial is one of many step-by-step tutorials in my new book 'Funky, Fresh Food - Your Step-By-Step Guide To Making Healthy Food Fun!' which is available for pre-order here. The book is due to be released July 1st 2013 & contains 48 illustrated pages to help you work your way through 26 fun, healthy snacks suited to both the lunchbox & the plate, as well as some handy tips & tricks including 6 ways to stop fruits from browning in your kidlets lunchbox & how to make rockmelon roses - a Creative Kidlets 101 exclusive tutorial!
It's as easy as punch! 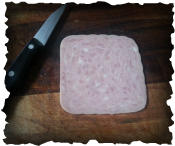
Start with a piece of ham; you can use round or square and a small knife. This technique can also work with turkey or a thin-cooked egg omelette.
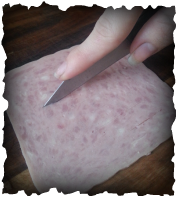
Cut lines in the middle of ham, but not all the way. The lines don’t need to be the exact same distance apart & depending on how thick or thin you want the ‘petals’ to be is how thick or thin of a gap you want between each slice. Be sure not to cut the lines too close to the edge of the ham otherwise your flower will split when you roll it up.
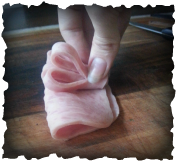
Fold the ham in half in the same direction that you made the slices. Roll up the folded ham but make sure to keep a fairly tight roll to keep the "stem" of the flower together & sturdy.
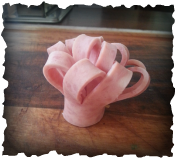
Fan out the petals of the ham flower & cut the base of the stem to make it flat if you prefer then tuck into the lunchbox or place it where you like on the plate.
"You are never too young to play with your food, all you need is a little imagination." - Emilie Moore (2011)  Education doesn't always have to be within the confines of worksheets and flashcards. There are millions upon millions of ways to teach children different things in a creative, exciting way. I mean, let's face it - would you rather have fun, or do worksheets all day? I don't know about you, but paperwork isn't exactly on my list of favourite things to do.
We all know kidlets love Fruit Loops, they are colourful, and sweet and outright tasty in the mind of a child. But have you ever considered using Fruit Loops to teach your special little person things like counting, sorting, colours, fine motor skills or patterns? If not, then welcome to the colourful world of creative learning in the eyes of yours truly! As Miss Arianna nears the age of schooling, I will be sharing more and more blogs on creative ways to teach your child basic life skills. This will include a huge range of ideas collected by myself to make learning feel, well, not like learning at all.
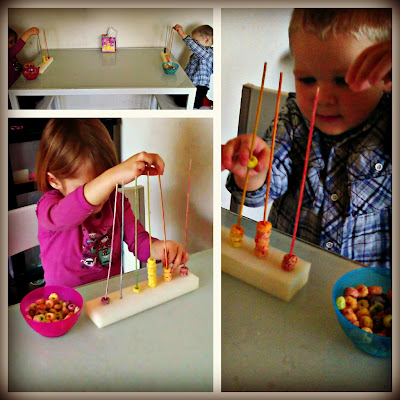
To create a 'workplace' for this activity get a piece of Styrofoam & 5 bamboo skewers. Colour (with crayons, felt pens, dye or paint - I used crayons) each skewer one colour each - red, orange, yellow, green, blue & purple. Then place them in that order spike down into the Styrofoam. I first asked them to sort the fruit loops into the colours and place them on the corresponding skewers, then I asked them to name the colours in a row. To make things a little trickier for them I asked them to count the fruit loops on each skewer for me. So all in all, this nifty trick taught them motor skills (getting the fruit loops onto the skewers), colours, sorting AND counting all in one activity!
Pictured - Miss A and Mr J enjoying their first creative learning lesson :)
 Back to school for most of you is fast approaching & some have even already started! For me, well, the kidlets aren't quite old enough for school or school lunches but that doesn't stop me from sharing some healthy ideas for lunch snacks. Today I ventured into the sweet & savory taste testing again while trying to think of new tasty nibbles to serve at Mr J's birthday party next month. And well, this is what I came up with.
Banana & peanut butter wraps are exactly what they say they are but with a scrumptious taste you would not expect. They are just as simple as making any other wrap or sandwich but give a new look & taste to the every day lunch box. To make these neat treats you simply spread peanut butter onto a sheet of pita bread (or wrap bread - whatever you prefer to call it) then place a peeled banana onto the peanut butter covered bread, you then proceed to roll up the banana in the wrap then slice it into little wrap rounds - it's as easy as that. They are perfect for lunch boxes & snacks on the go.
With CK101 giving you a little inspiration & motivation to get creative today - sugary snacks will be a thing of the past!
|


 RSS Feed