
Ham flowers are a fun, quick way to snazz up an everyday lunch. Whether it's in a lunchbox or on a plate, there's never a bad time for a ham flower to appear! These adorable little snacks are assembled in 4 simple steps, making them an easy fix to a boring meal in a matter of minutes!
This ham flower tutorial is one of many step-by-step tutorials in my new book 'Funky, Fresh Food - Your Step-By-Step Guide To Making Healthy Food Fun!' which is available for pre-order here. The book is due to be released July 1st 2013 & contains 48 illustrated pages to help you work your way through 26 fun, healthy snacks suited to both the lunchbox & the plate, as well as some handy tips & tricks including 6 ways to stop fruits from browning in your kidlets lunchbox & how to make rockmelon roses - a Creative Kidlets 101 exclusive tutorial!
This ham flower tutorial is one of many step-by-step tutorials in my new book 'Funky, Fresh Food - Your Step-By-Step Guide To Making Healthy Food Fun!' which is available for pre-order here. The book is due to be released July 1st 2013 & contains 48 illustrated pages to help you work your way through 26 fun, healthy snacks suited to both the lunchbox & the plate, as well as some handy tips & tricks including 6 ways to stop fruits from browning in your kidlets lunchbox & how to make rockmelon roses - a Creative Kidlets 101 exclusive tutorial!
It's as easy as punch!
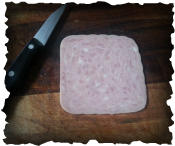
Start with a piece of ham; you can use round or square and a small knife. This technique can also work with turkey or a thin-cooked egg omelette.
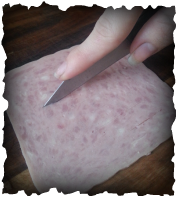
Cut lines in the middle of ham, but not all the way. The lines don’t need to be the exact same distance apart & depending on how thick or thin you want the ‘petals’ to be is how thick or thin of a gap you want between each slice. Be sure not to cut the lines too close to the edge of the ham otherwise your flower will split when you roll it up.
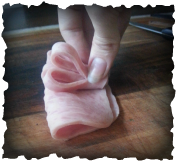
Fold the ham in half in the same direction that you made the slices. Roll up the folded ham but make sure to keep a fairly tight roll to keep the "stem" of the flower together & sturdy.
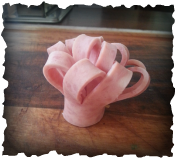
Fan out the petals of the ham flower & cut the base of the stem to make it flat if you prefer then tuck into the lunchbox or place it where you like on the plate.
Hungry for more? Follow us on Facebook!


 RSS Feed