Super Simple Ham, Cheese & Pineapple Pizza Scrolls!

A simple lunch snack idea that can replace that boring old sandwich in any lunch! These ham, cheese & pineapple pizza scrolls are sure to win over your little ones tummy & become a household favourite.
Ingredients:
2 cups self raising flour
90g butter, cubed
2/3 cup milk
1/4 cup pizza sauce
1 cup grated cheese (whatever your preference)
150g ham, coarsely chopped
1 x 225g can pineapple pieces, drained on paper towel
pinch of salt
Plain flour for dusting
Extra milk to brush
Let's Get Cooking!
These scrolls will keep in the fridge for up to 2 days when stored in an airtight container & are freezable for up to 1 month. But remember to bring the scrolls back to room temperature before packing them in a lunchbox or you will end up with a soggy scroll!
Ingredients:
2 cups self raising flour
90g butter, cubed
2/3 cup milk
1/4 cup pizza sauce
1 cup grated cheese (whatever your preference)
150g ham, coarsely chopped
1 x 225g can pineapple pieces, drained on paper towel
pinch of salt
Plain flour for dusting
Extra milk to brush
Let's Get Cooking!
- Preheat your oven to 210c & line a baking tray with non-stick baking paper.
- Sift flour & salt into a large bowl. Use your fingers to rub the butter into the flour until it resembles breadcrumbs.
- Add in the milk & use a butter knife in a cutting motion to mix until it is evenly incorporated & the mixture begins to hold together.
- Turn the dough out onto a lightly floured surface & gently knead until the mix is smooth then using a floured rolling pin roll out the dough into a 30cm x 40cm rectangle.
- Spread the pizza sauce evenly over the dough but leave a 2cm border around the edge. Sprinkle on the ham, cheese pineapple pieces then starting with a long side roll the dough up firmly to form a log.
- Brush the edge with some milk then press down firmly to seal.
- Cut crossways into 12 equal portions, roughly 3cm thick & place the scrolls on the lined baking tray.
- Bake in the oven for 25-30 minutes or until golden brown. Remove from the oven then set them aside to cool.
These scrolls will keep in the fridge for up to 2 days when stored in an airtight container & are freezable for up to 1 month. But remember to bring the scrolls back to room temperature before packing them in a lunchbox or you will end up with a soggy scroll!
10 Minute Muesli Bars!
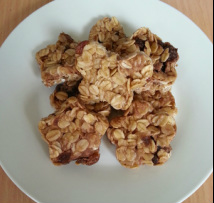
Muesli bars are an easy, healthy lunchbox staple. But they don't need to be store bought & they certainly don't need to be boring either! Follow this simple recipe below & get creative with the way you present them in the lunchbox - I promise they'll be a favourite!
Ingredients:
3 cups of rolled oats (you can toast them if you like but not required)
50g unsalted butter
1/3 cup of honey
1/4 cup of brown sugar
1/4 cup of chocolate chips (plus 2 tablespoons to sprinkle on top if you like)
1/2 cup of sultanas, coarsely chopped (can be swapped with dried cranberries, dried apricots etc)
1 tsp vanilla essence
pinch of salt
Let's Get Cooking!
- In a small saucepan place the butter, honey, sugar, vanilla essence and salt on medium heat. Stir until the butter has melted & the sugar has fully dissolved.
- Place your oats in a large, heat-proof bowl & pour in the butter mixture then stir well until all of the oats are covered in the mixture then let it cool for roughly 5 minutes.
- Once cooled, add your chocolate chips & sultanas into the bowl & mix well.
- Spoon mixture into a lined 19x29cm baking dish (anything at least 3cm deep is fine) and compress as much as possible into the tray.
- Sprinkle on some chocolate ships on top then gently push them in to stick them to the museli.
- Place the tray in the fridge for roughly 2 hours to let set then cut the mix into any shapes you like!
The ULTIMATE Mac & Cheese
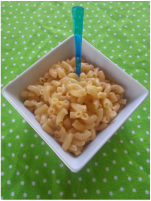
Mac & cheese is a favourite in this house & is great for lunchboxes - you can bake it into muffin shapes & it is just as tasty when eaten cold! This is the recipe I live by for my basic mac & cheese, sometimes I also like to add tuna or shredded chicken into the mix as well as some bacon bits every now & then just to make it more filling & add flavour. But enough of my rambling - here's the recipe!
Ingredients:
400g macaroni (or other medium tubular pasta)
1 1/2 cups cream
3/4 cup milk
1 1/4 cup grated tasty cheese
1/4 cup parmesan
1 tbsp butter
Salt & pepper to taste
Let's Get Cooking!
Ingredients:
400g macaroni (or other medium tubular pasta)
1 1/2 cups cream
3/4 cup milk
1 1/4 cup grated tasty cheese
1/4 cup parmesan
1 tbsp butter
Salt & pepper to taste
Let's Get Cooking!
- Cook macaroni as normal until al dente then drain & keep warm.
- In the same saucepan place the cream, milk & butter and heat until warm.
- Add in the cheeses, salt & pepper then stir on a medium-low heat until the cheese has melted.
- Add the pasta back into the saucepan & stir until the pasta is covered well in sauce.
- You can either take the pasta off the heat & serve as is or stir over a low heat until the sauce thickens to the consistency you would like.
Thai Chicken Bites

Ingredients:
500g chicken mince
1/2 cup breadcrumbs
2 spring onions - sliced
1/2 tablespoon ground coriander
1/2 cup chopped coriander
1/4 cup sweet chilli sauce
1 tbsp lemon juice
Let's Get Cooking!
- Preheat the oven to 200c. Mix the mince & breadcrumbs in a large bowl.
- Add the spring onion, ground & fresh coriander, chilli sauce & lemon juice, and mix well.
- Using damp hands, form bite sized balls & place them on a lined baking tray.
- Bake until cooked through - this will take around 5-10 minutes depending on the size of the bites.
These chicken bites are freezer friendly (up to 6 weeks), lunchbox friendly (can be eaten cold) and have a fridge life of up to 4 days.
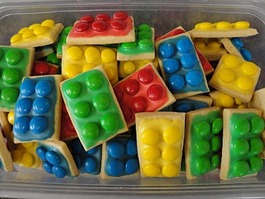
Lego Sugar Cookies!
Ingredients (Cookies):
2 3/4 cups plain flour
1 teaspoon baking soda (bi-carb soda)
1/2 teaspoon baking powder
1 cup butter (soften)
1 1/2 cups white sugar
1 egg
1 teaspoon vanilla essence
Royal Icing:
450g icing sugar (confectioners sugar)
2 large egg whites
To Bake The Cookies:
To Make The Icing & Decorate:
2 3/4 cups plain flour
1 teaspoon baking soda (bi-carb soda)
1/2 teaspoon baking powder
1 cup butter (soften)
1 1/2 cups white sugar
1 egg
1 teaspoon vanilla essence
Royal Icing:
450g icing sugar (confectioners sugar)
2 large egg whites
To Bake The Cookies:
- Preheat oven to 190 degrees C.
- In a small bowl, stir together flour, baking soda, and baking powder. Set aside.
- In a large bowl, cream together the butter and sugar until smooth. Beat in egg and vanilla. Gradually blend in the dry ingredients.
- Roll out the mix to about 5mm thickness between 2 pieces of grease-proof paper & place on a tray in the freezer until the mix becomes solid (about 10 minutes)
- Take the sheets out of the freezer & cut them into a mix of rectangles & squares in the desired Lego-block sizes.
- Bake 8 to 10 minutes in the preheated oven, or until golden.
- Let stand on cookie sheet two minutes before removing to cool on wire racks.
To Make The Icing & Decorate:
- In a bowl combine sugar and egg whites with an electric mixer.
- Mixing on low speed, add small amounts of water at a time (up to 1/2 cup) until it is a paste-like consistency.
- Mix until icing holds a ribbon-like trail on the surface of the mixture for 5 seconds when you raise the mixer.
- Once mixed you can add a teaspoon of vanilla essence for flavour & add the colour drops for the desired colour you would like.
- Using the back of a teaspoon or a butter knife, spread the icing on the cooled cookies then top with smarties or m&m's to create the lumps on the lego block.
- Allow the icing to set by placing the cookies in the fridge for a few minutes or leave them at room temperature for up to 2 hours to avoid the cookies 'sweating' when removed from the fridge.
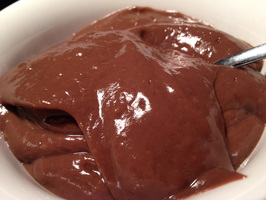
Homemade Yogo
Ingredients:
How To Do It!
Recipe Hints & Tips:
- 4 tablespoons cocoa
- 4 tablespoons cornflour
- 1/2 cup white caster sugar or equivalent sweetener
- 800ml of milk
How To Do It!
- Sift dry ingredients together and mix with 300ml of the milk.
- Meanwhile, bring to the boil the remaining 500ml of milk.
- Whisk in the chocolately milkontinue whisking on low heat until it thickens (can take up to 5 minutes).
- Pour into a bowl and cover with plastic film so it touches the top of the yogo and pop it into the fridge until it cools.
Recipe Hints & Tips:
- For a strawberry version, substitute the cocoa and half the sweetener for two tablespoons of strawberry Quik
- Homemade chocolate yogo can be kept in the fridge in a sealed air tight container for up to three days.
- Recipe can be frozen, it tastes like a Chocolate Paddlepop! However it does tend to separate a little on defrosting – so it will need a good stir. Can be frozen for up to two weeks.
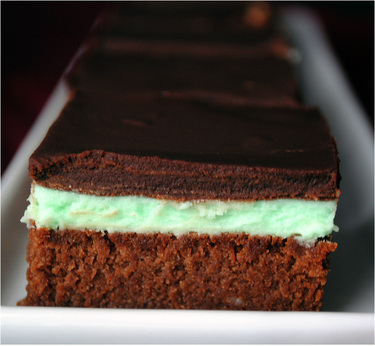
Healthy Mint Brownies
Ingredients:
BROWNIES:
How To Do It!
NOTE: Once the chocolate layer has firmed, be sure to cut all the brownies immediately with a sharp knife. I cut some of the brownies when they were really, really cold, and they didn't cut clean and pretty.
*For those who are not concerned with gluten content, wheat or white flour would work okay as well. For wheat, decrease the amount by 1 tablespoon. For the filling, be sure to use a white color flour to keep the mint filling a bright pretty green colour.
**You can use any kind of chocolate you like, but dark chocolate gives a wonderful flavor to the peppermint and sugar free dark chocolate is the easiest to find.
BROWNIES:
- 1/3 cup Almond Milk
- 1 Tablespoon Applesauce
- 3 Tablespoons Ground Flax
- 1/2 cup Blueberries (Fresh Or Frozen)
- 1 Whole (2 halves) canned or jar unsweetened Pear
- 1- 15 ounce can Black Beans, drained and rinsed
- 1 Tablespoon Grape seed Oil
- 1 teaspoon Vanilla Extract
- 1/2 teaspoon Natural Butter Extract
- 3/4 cup plus 1 Tablespoon Coconut Sugar
- 3/4 cup plus 1 Tablespoon Cocoa Powder
- 1 teaspoon Baking Powder
- 1/4 teaspoon Baking Soda
- 1/2 teaspoon Sea Salt
- 3 Tablespoons White Spelt Flour or Rice Flour
- 1/2 cup Dark Chocolate Chunks or Chips
- 1/4 cup ripe, soft Avocado
- 1 Tablespoon Whipped Coconut Cream or Thickened Cream
- 1/2 cup Powdered Xylitol (found in health food stores)
- 3/4 teaspoon Pure Peppermint Extract
- 1 Drop Natural Green Food Coloring (Optional)
- 2 Tablespoons White Spelt Flour or White Flour
- 140g Dark Chocolate
- 1 teaspoon Neutral Oil of choice
How To Do It!
- Preheat the oven to 175c degrees. Line a 22x22cm or 18x28cm baking sheet with parchment paper and set aside.
- Combine the flax, applesauce and almond milk together in a small bowl. Set aside to allow to thicken. In a food processor, combine the blueberries, pear, black beans and oil. Pulse until the mixture become very smooth. Next, add the extracts and process until fully combined. Remove the contents from processor into a medium sized mixing bowl. Add the coconut sugar, cocoa, baking powder, soda, and salt and mix. Add the flour with the chocolate chips and mix until just combined. Pour the batter into your prepared dish and bake at 175c for 44-45 minutes.
- Remove from the oven and allow to cool for at least 50 minutes. If you would like, place the brownies in the fridge for 20 or 30 minutes to speed up cooling time. While the brownies cool, start on your mint filling.
- In a small bowl, combine the soft avocado with full fat coconut milk or thickened cream. Beat on high for about 5 minutes until the mixture is fluffy and smooth. Add the powdered xylitol and mix well. Add peppermint extract and coloring if desired, and beat until all incorporated. Once the mixture is perfectly fluffy and creamy, add the flour and mix until just combined. The mixture should be thick and smooth but still easy to spread. Spread the mixture evenly over the cooled brownies and place in the fridge for 10 minutes, until the mint filling has firmed.
- Next, melt the chocolate. Add the oil to the melted chocolate and stir to combine. Remove the brownies from the fridge and pour the melted chocolate over the brownies, gently and quickly spread the chocolate evenly over the brownies. The mint filling should be cold so the warm chocolate doesn't melt the mint filling, but the chocolate will cool quickly once it touches the cold mint. Make sure to work quickly so the chocolate layer will be even. Return the brownies to the fridge to cool for another 5 minutes until the chocolate is set.
- Cut the brownies after the 5 minutes with a sharp knife. Serve brownies chilled or at room temperature. Store any left overs in an airtight container in the refrigerator.
NOTE: Once the chocolate layer has firmed, be sure to cut all the brownies immediately with a sharp knife. I cut some of the brownies when they were really, really cold, and they didn't cut clean and pretty.
*For those who are not concerned with gluten content, wheat or white flour would work okay as well. For wheat, decrease the amount by 1 tablespoon. For the filling, be sure to use a white color flour to keep the mint filling a bright pretty green colour.
**You can use any kind of chocolate you like, but dark chocolate gives a wonderful flavor to the peppermint and sugar free dark chocolate is the easiest to find.
Piggy Pizza Pockets
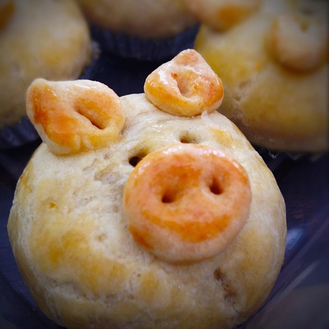
Makes about 20 piglets:
Dough:
400g all purpose flour
1 package instant dry yeast (7g or 2 tsp)
1 egg
200ml plain yogurt
100ml warm milk
a pinch of salt
Puffed or flaky dough:
150g flour
100g margarine (unsalted)
pinch of salt
Wash:
Egg white to use as an 'adhesive'
Egg yolk and some milk to brush at the end
Filling: Your choice - we used a mix of herbs, cheese, bacon bits & tomato paste.
How to do it!
Enjoy!
TIP: You can swap the filling for savoury mince to make piggy pies or if you want something a little sweet swap the follings for some chocolate and/or marshmallows!
Dough:
400g all purpose flour
1 package instant dry yeast (7g or 2 tsp)
1 egg
200ml plain yogurt
100ml warm milk
a pinch of salt
Puffed or flaky dough:
150g flour
100g margarine (unsalted)
pinch of salt
Wash:
Egg white to use as an 'adhesive'
Egg yolk and some milk to brush at the end
Filling: Your choice - we used a mix of herbs, cheese, bacon bits & tomato paste.
How to do it!
- First, make first dough by mixing all ingredients, and let it rise in a warm place. In the meantime, make puff dough with second batch of ingredients, and then mix it into the risen dough (yes, mix'em together), and work it well on a floured surface. Roll the dough and with a round cookie cutter or something else cut out circles about 5cm in diameter or desired size. Leave some dough for ears and noses!
- Make filling with cheese, bacon bits, tomato sauce (pizza sauce), and oregano. You can be creative and use different kinds of ingredients to make a filling of your own. You can also add ham, or salami, or vegetables.
- Place half of circles onto baking sheet (aligned with parchment paper), brush edges with egg white wash. Put some filling in the middle, cover with other half of circles, and press the edges to assure nothing will come out while baking.
- Remainder of the dough use to make smaller circles for nose, and for ears by cutting them into quarters. Use egg whites wash as 'adhesive' for ears and nose. For nose make somewhat smaller circles. For eyes and nostrils use a toothpick to make little spots and then inside, put cumin, pepper or something similar.
- Now that you have little piglets, let them rise again for a little while, and then brush them with a little bit of egg yolk wash mixed with a little bit of milk. Bake for about 20-25 minutes at about 180c.
Enjoy!
TIP: You can swap the filling for savoury mince to make piggy pies or if you want something a little sweet swap the follings for some chocolate and/or marshmallows!
Banana Wraps
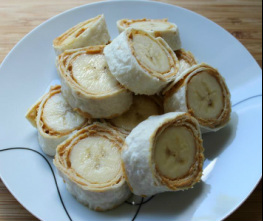
For me, well, the kidlets aren't quite old enough for school or school lunches but that doesn't stop me from sharing some healthy ideas for lunch snacks. Today I ventured into the sweet & savory taste testing again
Banana & peanut butter wraps are exactly what they say they are but with a scrumptious taste you would not expect. They are just as simple as making any other wrap or sandwich but give a new look & taste to the everyday lunch box.
To make these neat treats you simply spread peanut butter onto a sheet of pita bread (or wrap bread - whatever you prefer to call it) then place a peeled banana onto the peanut butter covered bread, you then proceed to roll up the banana in the wrap then slice it into little wrap rounds - it's as easy as that. They are perfect for lunch boxes & snacks on the go. You can even change the peanut butter for a chocolate spread or creamy raspberry spread!
With CK101 giving you a little inspiration & motivation to get creative today - sugary snacks will be a thing of the past!
Bite-Sized Banana Muffins
 Serving Suggestion For Kids' Parties
These yummy bite sized muffins are a great, healthy addition to any lunchbox. With the added bonus of being freezable & the ability to keep for a few days in an airtight container, these are a great staple snack for your little ones midday meals.
Ingredients:
3-4 ripened bananas
1 cup sugar
2 tablespoons butter
1 egg (beaten)
1 1/2 cups self raising flour
2 tablespoons milk
Let's Get Cooking!
TIP: Mix it up a little by adding food colouring, or even chocolate chips!
Ingredients:
3-4 ripened bananas
1 cup sugar
2 tablespoons butter
1 egg (beaten)
1 1/2 cups self raising flour
2 tablespoons milk
Let's Get Cooking!
- Preheat oven to 180c & grease a mini muffin tin.
- Mash bananas really well then add the egg. You can do this with a fork, masher or stick mixer. I like to throw mine in the food processor with the beaten egg until it's nice & smooth so that it spreads evenly & takes out all the lumps.
- Add all the other ingredients & mix until all completely combined.
- Cook for about 10 minutes or until risen & golden brown. For normal sized muffins cook for about 20 minutes.
TIP: Mix it up a little by adding food colouring, or even chocolate chips!
Cheddarmite Scrolls

In celebration of Easter, I made these for breakfast in the shape of bunnies however you don't need to make them look like bunnies, you can make them look like whatever you want. This recipe also doubles as a pizza base recipe so it's a good one to write down, bookmark or print out!
Ingredients:
7g sachet dry yeast
1 teaspoon caster sugar
1/2 teaspoon salt
2 cups plain flour
2 tablespoons olive oil
2 cups grated cheese
1/2 cup vegemite spread
Let's Get Cooking!
Ingredients:
7g sachet dry yeast
1 teaspoon caster sugar
1/2 teaspoon salt
2 cups plain flour
2 tablespoons olive oil
2 cups grated cheese
1/2 cup vegemite spread
Let's Get Cooking!
- Combine 3/4 cup warm water, yeast, sugar and salt in a jug. Whisk with a fork to dissolve. Cover with plastic wrap. Set aside in a warm place for 5 minutes or until bubbles appear on the surface.
- Sift flour into a bowl. Add yeast mixture and oil. Mix to form a soft dough. Turn onto a lightly floured surface. Knead for 10 minutes or until elastic. Place in a lightly greased bowl. Cover with plastic wrap. Stand in a warm place for 25 to 30 minutes or until dough has doubled in size.
- Use your fist to punch dough down. Knead on a lightly floured surface until smooth and then roll to form a 40 cm x 25 cm rectangle.
- Spread the Vegemite over the dough then sprinkle over 3/4 of the cheese. Roll up along the long side to enclose the cheese. Cut 10 x 4cm pieces from the roll and place close together, cut side up on a greased baking tray.
- Sprinkle with the remaining cheese and bake in a hot oven 220ºC for 15-20 minutes or until cooked and golden.
Ham & Vegetable Rice Paper Rolls
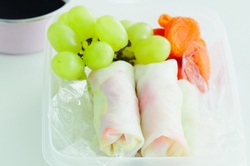
A quick scrumptious snack that even the kidlets can make themselves!
Ingredients;
125g shaved ham
1 peeled carrot
1 red capsicum
6 iceberg lettuce leaves
12 small rice paper wrappers
Dipping Sauce: Hoisin or sweet chilli sauce.
Let's Get Cooking!
Ingredients;
125g shaved ham
1 peeled carrot
1 red capsicum
6 iceberg lettuce leaves
12 small rice paper wrappers
Dipping Sauce: Hoisin or sweet chilli sauce.
Let's Get Cooking!
- Cut ham into thin strips. Grate carrot. Cut sides off the capsicum and remove the seeds and membrane then cut the sides into strips. Tear lettuce into small pieces. Place all ham & vegetables on a platter.
- Place a clean, dry tea towel on a weorkbench. Fill a large, shallow bowl with warm water. Dip a rice paper sheet into the water until soft. Remove ths sheet and place it on the towel.
- Place lettuce, capsicum, carrot & ham on one edge of the sheet. leave 2cm at the top and bottom. Fold in the top and bottom then roll the filling up & place thrm seam side down on a plate under a damp towel.
- Repeat step 3 for the remaining 11 of them and serve with a dipping sauce.
Ham & Pineapple Muffins!

Make a batch of these more-ish muffins to keep in the freezer so that you never have to worry about school lunches again.
Ingredients:
2 cups self-raising flour
2 tablespoons caster sugar
1 teaspoon baking powder
225g can pineapple pieces in natural juice, drained
80g shaved ham, chopped
1 cup grated tasty cheese
2 eggs
3/4 cup milk
1/2 cup olive oil
Let's Get Cooking!
Ingredients:
2 cups self-raising flour
2 tablespoons caster sugar
1 teaspoon baking powder
225g can pineapple pieces in natural juice, drained
80g shaved ham, chopped
1 cup grated tasty cheese
2 eggs
3/4 cup milk
1/2 cup olive oil
Let's Get Cooking!
- Preheat oven to 200°C. Lightly grease a 6-hole muffin pan.
- Sift flour, sugar and baking powder into large bowl. Add pineapple, ham and cheese and stir to combine. Using a fork, whisk eggs, milk and oil together in a jug until combined. Add to dry ingredients. Using a large metal spoon, stir until just combined.
- Two-thirds fill muffin holes with mixture. Bake for 20 to 25 minutes or until a skewer inserted into the centre comes out clean. Stand muffins in pan for 5 minutes. Turn onto a wire rack to cool completely.
Ham & Cheese Pinwheels!

Pinwheels are a favourite in this house & such an easy snack to make. I usually find myself making a double batch so that I still have enough left to go in the freezer by the time I've finished wrapping them! This recipe is kid-friendly so don't be afraid to get your little one to help along too!
Ingredients:
1 sheet of ready-rolled puff pastry
1/3 cup of grated cheese
2 tablespoons tomato paste
½ teaspoon dried oregano
60g diced ham or bacon
Lets Get Cooking!
Ingredients:
1 sheet of ready-rolled puff pastry
1/3 cup of grated cheese
2 tablespoons tomato paste
½ teaspoon dried oregano
60g diced ham or bacon
Lets Get Cooking!
- Put the sheet of pastry on a big chopping board.
- Spread the tomato paste over the pastry, sprinkle with the oregano, bacon and cheese.
- Roll up the pastry into a tight roll. Wrap in plastic wrap. Put roll into the fridge for 1 hour.
- Preheat oven to 200°C (400°F).
- Grease a baking tray.
- Take roll out. Cut into slices about 2.5cm (1 inch) wide.
- Bake for 15 minutes until golden brown.
- Leave on a wire rack allow to cool.
Crustless Mini Quiches

A quick lunch you can prepare in minutes. This mini quiche recipe cooks fast and also tastes lovely cold. Works well for school lunches or picnics. Alternatively you can pop them in the fridge and send for their school lunch the next day.
Ingredients:
4 eggs
small onion
150 grams of diced bacon
2 tbsp sour cream
1 tablespoon chopped fresh basil
small grated zucchini
1/2 cup of grated cheese
3 cherry tomatoes
Lets Get Baking!
Ingredients:
4 eggs
small onion
150 grams of diced bacon
2 tbsp sour cream
1 tablespoon chopped fresh basil
small grated zucchini
1/2 cup of grated cheese
3 cherry tomatoes
Lets Get Baking!
- Preheat oven to 200°C (375°F) and grease a 6 whole muffin tray.
- Fry onion and bacon and set aside.
- In a bowl beat the eggs and add the sour cream, basil, zucchini and 1/4 cup of the cheese.
- Mix in the cooked bacon and onion.
- Pour into the muffin holes and fill to 2/3 as they will rise nicely.
- Cut the cherry tomato’s in half and place on top of each mini quiche, sprinkle over the rest of the cheese.
- Bake for 20 minutes. Allow to cool for 5 minutes before taking out.
Banana Bread
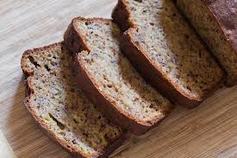
Quick and easy school lunch. A moist sweet bread that has mashed bananas included. The kids love it as it is a bit sweeter than your standard bread. Once you have baked this bread, you can then slice it add some butter and freeze it, giving you another quick and easy lunch morning. We all have those crazy mornings where everything can, does go wrong. So grab some lunch out of the freezer pack it and go.
Ingredients:
125 grams butter
1 cup castor sugar
2 large bananas
2 eggs
1 teaspoon bicarbonate of soda
2 cups plain flour
1/2 teaspoon salt
1/2 cup milk
1 teaspoon lemon juice
Lets Get Baking!
Ingredients:
125 grams butter
1 cup castor sugar
2 large bananas
2 eggs
1 teaspoon bicarbonate of soda
2 cups plain flour
1/2 teaspoon salt
1/2 cup milk
1 teaspoon lemon juice
Lets Get Baking!
- Preheat oven to 180°C (350°F) and grease and line loaf tin.
- Beat butter and sugar to a cream. Peel and mash bananas with lemon juice. Add to creamed mixture.
- Add eggs and beat well.
- Sift dry ingredients together. Add milk to dry ingredients alternately with the cream mixture and mix until combined.
- Pour mixture into well greased loaf tin. Bake in a moderate oven for 1 to 1 & 1/4 hours.
- Allow to cool then slice and serve with butter or freeze for packed lunches.
